Note to "Zero point calibration sensors of Toyota/Lexus

Модератор: alflash

Аватара пользователя
alflash
Сообщения: 4167
Зарегистрирован: 18 фев 2007, 21:46
Откуда: Одесса
Контактная информация:

Note to "Zero point calibration sensors of Toyota/Lexus

Сообщение alflash »

Oбращаю ваше внимание на то что, ранее приведенная методика* выполнения этой "операции" имеет ограниченные рамки, т.е. не самодостаточна для некоторых моделей (например, при DTC C1336/39).
alflash в http://forum.mek1.ru/viewtopic.php?f=12&t=2624 писал(а):* "Данная процедура описывает проведение калибровки нулевой точки нескольких датчиков: yaw rate*, deceleration sensors без использования диагностического сканера и, возможно, будет полезна для устранения результатов подключения неудачного сканера или просто после ремонта соответствующих систем.
1.Включите зажигание.
2.Используя "перемычку" замкните-разомкните контакты Ts и CG в DLC3 4 и более раза в течение 8 секунд.
3.Проверьте включение лампы индикатора VSC, что является признаком "очистки" записи о предыдущей нулевой точке.
4.Выключите зажигание.
5.Убедитесь в том, что упомянутые выше контакты, разомкнуты.
6.Включите зажигание.
7.Убедитесь в том, что индикатор неисправности VSC гаснет через 15 секунд после включения зажигания.
8.После этого выключите зажигание в течение 2 секунд.
9.Соедините Ts и CG в DLC3.
10.Включите зажигание.
11.Убедитесь в том, что индикатор неисправности VSC светится приблизительно 4 секунды и быстро мигает с интервалом 0.13 сек.
12.Если это так, то выключите зажигание в течение 2 сек.
13.Уберите перемычку.
14.Перемещайтесь на машине по крайней мере 5 минут для того, чтобы подтвердить завершение калибровки нулевой точки.
Прим. 2.
Обратите внимание. на то, что после ремонта при просмотре Data List диагностическим сканером, Steering Angle Sensor может "показывать" 1150 (пока не достигнута скорость 45 км/час). Это "нормально" до тех пор, пока "learned values of the steering angle have been achieved"."(Toyota TSB BR001-04R http://alflash.com.ua/tsb/ZERO%20POINT%20CALIBRATION.pdf ) )
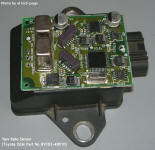
* Изображение ( CAN Yaw Rate & Deceleration Sensor : http://alflash.com.ua/Learn/6569s.jpg )
lc100_yaw_sensor.gif
lc100_yaw_sensor.gif (7.48 КБ) 33075 просмотров
А вот пример как это делается у Lexus GX470 2007:
RM000001DWZ007X 4-17-2009 писал(а):1. CLEAR ZERO POINT CALIBRATION (SST CHECK WIRE**)
HINT: After replacing the yaw rate and acceleration sensor, make sure to clear zero point calibration data in the skid control ECU and perform zero point calibration.
a) Turn the ignition switch to the ON position.
b) Using SST, connect and disconnect terminals TS and CG of the DLC3 4 times or more within 8 seconds.
c) Check that the warning light indicates the normal system code.
d) Remove the SST from the terminals of the DLC3.
e) Using a check wire, perform zero point calibration of the yaw rate and acceleration sensor.
3. PERFORM ZERO POINT CALIBRATION OF YAW RATE AND ACCELERATION SENSOR (SST CHECK WIRE).
NOTICE:
•While obtaining the zero point, do not vibrate the vehicle by tilting, moving or shaking it and keep it in a stationary condition. (Do not start the engine.)
•Be sure to do this on a level surface (with an inclination of less than 1 degree).

a) Procedures for test mode:
1) Turn the ignition switch off.
2) Using SST, connect terminals TS and CG of the DLC3.
3) Check that the steering wheel is in the straight- ahead position and more the shift lever to the P position.
NOTICE: DTC C1210/36 and C1336/39 will be recorded if the shift lever is not in the P position.
4) Turn the ignition switch to the ON position.
5) Keep the vehicle in a stationary condition on a level surface for 2 seconds or more.
6) Check that the VSC TRAC warning light is blinking in test mode.
NOTICE:The VSC TRAC warning light stays on when obtaining the zero point.
•If the VSC TRAC warning light does not blink, perform the zero point calibration again.
•The zero point calibration is performed only once after the system enters test mode.
•Calibration cannot be performed again until the stored data is cleared once.
В TSB BR001-04 (http://alflash.com.ua/tsb/ZERO%20POINT%20CALIBRATION.pdf) описание "ZERO POINT CALIBRATION" для ’04 – ’05 4Runner, Camry, Highlander, Land Cruiser, RAV4, Sienna, Solara, Tundra, & Scion xB with VSC

** Следует знать и помнить, что назначение некоторых контактов диагностического разъема DLC3 зависит от модельного года автомобиля. В противном случае могут возникать такие недоразумения с контактом Ts: http://alflash.com.ua/sequoia.htm , варианты расположения которого указаны в http://alflash.com.ua/dlc.htm
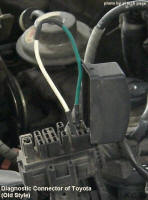
*** Изображение - Short Wire aka "staple" on DLCNo.1
Аватара пользователя
alflash
Сообщения: 4167
Зарегистрирован: 18 фев 2007, 21:46
Откуда: Одесса
Контактная информация:

Re: Note to Zero point calibration sensors of Toyota/Lexus

Сообщение alflash »

Методика калибровки датчиков более современных авто.
Например, CALIBRATION on 2008 MY Highlander [05/2007 -]
2008 Highlander Repair Manual (RM06J0U) писал(а):2. OBTAIN ZERO POINT OF YAW RATE AND ACCELERATION SENSOR (When Using Techstream - viewtopic.php?f=16&t=350)
  • NOTICE:
    • While obtaining the zero points, keep the vehicle stationary and do not vibrate, tilt, move, or shake it. (Do not start the engine.)
    • Be sure to perform this procedure on a level surface (with an inclination of less than 1 degree)
.(a) Clear the zero point calibration data.
(1) Turn the ignition switch off.
(2) Check that the steering wheel is in the straight-ahead position.
(3) Check that the shift lever is in the P position.
(4) Connect Techstream to the DLC3.
(5) Turn the ignition switch on (IG).
(6) Turn Techstream on.
(7) Select the skid control ECU to clear the zero point calibration data using Techstream. Enter the following menus: Chassis / ABS/VSC/TRAC / Utility / Reset Memory.
(8) Turn the ignition switch off.
  • NOTICE:
    If the ignition switch is turned on (IG) for more than 15 seconds with the shift lever in the P position after the zero points of the yaw rate and acceleration sensor have been cleared, only the zero point of the yaw rate sensor will be stored. If the vehicle is driven under these conditions, the skid control ECU will store the zero point calibration for the acceleration sensor as not being completed. The skid control ECU will then also indicate this as a malfunction of the VSC system using the indicator lights
.b) Perform the zero point calibration of the yaw rate and acceleration sensor.
(1) Turn the ignition switch off.
(2) Check that the steering wheel is in the straight-ahead position.
(3) Check that the shift lever is in the P position.
  • NOTICE:
    DTCs C1210 (zero point calibration of yaw rate sensor undone) and C1336 (zero point calibration of acceleration sensor undone) will be recorded if the shift lever is not in the P position.
(4) Connect Techstream to the DLC3.
(5) Turn the ignition switch on (IG).
(6) Turn Techstream on.
(7) Switch the skid control ECU to Test Mode using Techstream. Enter the following menus: Chassis / ABS/VSC/TRAC / Utility / Test Mode.
(8) After Test Mode has been entered, keep the vehicle stationary on a level surface for 2 seconds or more.
(9) Check that the VSC OFF indicator light comes on for several seconds and then blinks in Test Mode.
  • HINT:
    • If the VSC OFF indicator light does not blink, perform zero point calibration again.
    • The zero point calibration is performed only once after the system enters Test Mode.
    • Calibration cannot be performed again until the stored data is cleared.
(10) Turn the ignition switch off and disconnect Techstream.
3. OBTAIN ZERO POINT OF YAW RATE AND ACCELERATION SENSOR (When not Using Techstream)
  • NOTICE:
    • While obtaining the zero points, keep the vehicle stationary and do not vibrate, tilt, move, or shake it. (Do not start the engine.)
    • Be sure to perform this procedure on a level surface (with an inclination of less than 1 degree).
(a) Clear the zero point calibration data.
(1) Turn the ignition switch off.
(2) Check that the steering wheel is in the straight-ahead position.
(3) Check that the shift lever is in the P position.
(4) Turn the ignition switch on (IG).
(5) The warning light and indicator light come on for 3 seconds to indicate that the initial check is completed.
(6) Using SST, connect and disconnect terminals TS * and CG of the DLC3 4 times or more within 8 seconds. SST: 09843-18040
(7) Check that the VSC OFF indicator light comes on.
  • NOTICE:
    If the ignition switch is turned on (IG) for more than 15 seconds with the shift lever in the P position after the zero points of the yaw rate and acceleration sensor have been cleared, only the zero point of the yaw rate sensor will be stored. If the vehicle is driven under these conditions, the skid control ECU will store the zero point calibration for the acceleration sensor as not being completed. The skid control ECU will then also indicate this as a malfunction of the VSC system using the indicator lights.
(b) Perform the zero point calibration of the yaw rate and acceleration sensor.
(1) Turn the ignition switch off.
(2) Check that the steering wheel is in the straight-ahead position.
(3) Check that the shift lever is in the P position.
  • NOTICE:
    DTCs 36 (zero point calibration of yaw rate sensor undone) and 39 (zero point calibration of acceleration sensor undone) will be recorded if the shift lever is not in the P position.
.(4) Using SST, connect terminals TS * and CG of the DLC3. ST: 09843-18040
(5) Turn the ignition switch on (IG).
(6) After Test Mode has been entered, keep the vehicle stationary on a level surface for 2 seconds or more.
(7) Check that the VSC OFF indicator light comes on for several seconds and then blinks in Test Mode.
  • HINT:
    • If the VSC OFF indicator light does not blink, perform zero point calibration again.
    • The zero point calibration is performed only once after the system enters Test Mode.
    • Calibration cannot be performed again until the stored data is cleared.
(8) Turn the ignition switch off and disconnect SST from the DLC3.
HTH,

p.s. Методика для старенького LEXUS LS430 (2001MY).
RM812U писал(а):7. IF NECESSARY, PERFORM ZERO POINT CALIBRATION OF YAW RATE AND DECELERATION SENSORS.
...(a) Clear the zero points of the yaw rate and deceleration sensors.
...
(b) Obtain zero point of the yaw rate sensor.
...
c) Perform deceleration sensor zero point calibration.
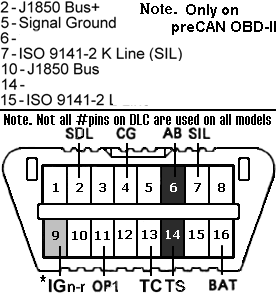
(1) Using SST, connect the terminals Ts and CG of DLC3* (pins #14 and #4)
(2) Turn the ignition switch ON.
  • HINT: Place the vehicle in a stationary condition with the shift lever in P range.
(3) After turning the ignition switch ON, check that the VSC warning light is lit for about 4 sec. and then starts quick blinking at 0.13 sec. intervals. (4) After ensuring the blinking of the VSC OFF indicator light for 2 sec., turn the ignition switch OFF. (5) Remove the SST and make the terminals Ts and CG of DLC3 disconnected.
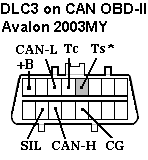
* Примечание. Расположение контакта TS в авто с CAN-OBDII:
Изображение
Для справки. Расположение контакта TS в авто предыдущего поколения:
Изображение
CG_SG pin of Toyota DLC3
cg_sg.gif (8.31 КБ) 33327 просмотров
Lexus LX470 DLC3 pins
dlc-0505a.gif (7.39 КБ) 33320 просмотров
Аватара пользователя
alflash
Сообщения: 4167
Зарегистрирован: 18 фев 2007, 21:46
Откуда: Одесса
Контактная информация:

Re: Note to "Zero point calibration sensors of Toyota/Lexus

Сообщение alflash »

CALIBRATION OF TORQUE SENSOR ZERO POINT (USING SST CHECK WIRE) on AVENSIS
RM1018E писал(а):HINT: Perform this operation in the following cases.
• When removing and installing ”steering wheel assembly”, ”tilt steering column assembly” and ”steering gear assembly”.
• When replacing power steering ECU assy.
(a) Place front wheels and steering wheel facing straight ahead.
(b) Perform the torque sensor zero point initialization.
HINT: If the power steering ECU assy is replaced, initialization is not necessary.
(1) Stop the vehicle and turn the ignition switch OFF.
(2) Using SST, connect terminals Ts and CG of DLC3. SST 09843–18040
(3) Using SST, connect terminals Tc and CG of DLC3. SST 09843–18040
(4) Turn the ignition switch ON.
(5) Disconnect and connect the terminal Tc of DLC3 20 times within 20 seconds.
(6) Check the DTC C1515/15 output.

Perform the torque sensor zero point calibration.
HINT:
• Do not touch the steering wheel.
• Check that the DTC for except C1515/15 is not output.
(1) Stop the vehicle and turn the ignition switch to OFF.
(2) Using SST, connect terminals Ts and CG of DLC3 and turn the ignition switch to ON. SST 09843–18040
(3) Disconnect the SST. SST 09843–18040
(4) Check the DTC is not output.
Для COROLLA, COROLLA VERSO, AVENSIS (Model Code : AZT25#, ADT25#, CDT250, ZZT25#, AUR10, CUR10, ZNR1#, CDE120, NDE120, ZZE12# with VSC)
TSB CP-7020 писал(а):... STEERING ANGLE SENSOR ZERO POINT CALIBRATION (Using SST Check Wire)
  • Notice:
    When replacing the steering angle sensor, skid control ECU, or ECM, or adjusting the front wheel alignment or steering wheel center point in accordance with removal, installation or replacement of the suspension, axle or steering parts, make sure to perform zero point calibration.
    Hint:
    Make sure the steering off center angle is within +-3° when assembling the steering wheel. Do not use the intelligent tester to determine the angle. It should be done visually.
1.Turn the ignition switch off.
2.Check that the steering wheel is centered and move the shift lever to the P position (for A/T) or apply the parking brake (for M/T).
3.Using SST, connect terminals TS and CG of the DLC3. SST Part Number: 09843-18040.
4.Turn the ignition switch on.
5.Depress the button for TRC OFF and hold it.
6.Keep the TRC OFF switch depressed while depressing and releasing fully the brake pedal 3 times or more within 2 seconds (time starts with first pedal stroke).
7.Check that the skid control buzzer sounds for around 3 seconds.
8.Hold the TRC OFF switch until the skid control buzzer stops sounding. When it stops sounding, release the switch.
9.Check that the ABS warning, BRAKE warning, VSC warning, TRC OFF indicator and SLIP indicator lights come on for approximately 3 seconds after the skid control buzzer sounds.
  • Hint:
    The skid control buzzer sounds to indicate that the sensor calibration has been completed normally.
    When the zero point calibration has been completed normally, all memorized DTCs will be cleared.
    If the skid control buzzer does not sound, perform the sensor calibration again.
    Do not turn the ignition switch off or drive the vehicle until all the warning lights go off.
10.Turn the ignition switch off and disconnect the SST from the DLC3.
--------------------------------------------
yaw.gif
yaw2.gif
----------------------------------------
ИНИЦИАЛИЗАЦИЯ ДАТЧИКА УГЛА ПОВОРОТА И КАЛИБРОВКА "НУЛЯ" ДАТЧИКА КРУТЯЩЕГО МОМЕНТА (В РУЧНОМ РЕЖИМЕ) CAMRY (ASV50/GSV50).
...Удалите данные калибровки датчика.
Установите рулевое колесо в центральное положение и расположите передние колеса строго прямо.
Выключите зажигание.
С помощью SST соедините контакты 12 (TS) и 4 (CG) на DLC3.
ПРИМЕЧАНИЕ: Во избежание выхода системы из строя обратите особое внимание на выбор соединяемых контактов.
Включите зажигание (IG), а затем не менее 20 раз соедините и разъедините контакты 13 (TC) и 4 (CG) в течение 20 с.
Убедитесь, что контрольная лампа мигает, а затем остается включенной.
УКАЗАНИЕ: Свечение контрольной лампы указывает на регистрацию кодов DTC C1515 и C1525.
Выключите зажигание.
ПРИМЕЧАНИЕ: После удаления данных калибровки датчика невозможно выполнить инициализацию датчика угла поворота или калибровку "нуля", если зажигание включено (IG).
Калибровка "нуля" датчика крутящего момента.
ПРИМЕЧАНИЕ: Так как калибровка "нуля" датчика крутящего момента не может быть выполнена, если сохранен DTC C1515, обязательно удалите данные калибровки датчика перед началом калибровки "нуля" датчика крутящего момента.
Установите рулевое колесо в центральное положение и расположите передние колеса строго прямо.
Выключите зажигание.
С помощью SST соедините контакты 12 (TS) и 4 (CG) на DLC3.
Включите зажигание (IG), а затем соедините контакты 13 (TC) и 4 (CG).
ПРИМЕЧАНИЕ: Во время калибровки не прикасайтесь к рулевому колесу (в течение 3 с).
УКАЗАНИЕ: Контрольная лампа остается включенной, даже когда калибровка завершена.
При соединенных контактах 12 (TS) и 4 (CG), а также 13 (TC) и 4 (CG), и включенном зажигании (IG), перейдите к инициализации датчика угла поворота.
Инициализация датчика угла поворота.
ПРИМЕЧАНИЕ: Так как инициализация датчика угла поворота не может быть выполнена, если сохранен DTC C1525, обязательно удалите данные калибровки датчика и точку "нуля" датчика крутящего момента перед тем, как выполнять инициализацию датчика угла поворота.
Установите рулевое колесо в центральное положение и расположите передние колеса строго прямо.
ПРИМЕЧАНИЕ:
Удостоверьтесь, что контакты 12 (TS) и 4 (CG), а также 13 (TC) и 4 (CG) соединены, и зажигание включено.
Разъедините и вновь соедините контакты 13 (TC) и 4 (CG).
УКАЗАНИЕ: Разъединение и последующее соединение контактов 13 (TC) и 4 (CG) позволяет ЭБУ рулевого управления с усилителем переключиться в режим инициализации датчика угла поворота.
Поверните рулевое колесо влево и вправо на угол не менее 45°. Затем поверните рулевое колесо влево или вправо на угол не менее 90°.
ПРИМЕЧАНИЕ: Не поворачивайте рулевое колесо резко.
УКАЗАНИЕ: Когда калибровка завершена должным образом, контрольная лампа перестает светиться постоянно и начинает мигать (с интервалом 0,125 с).
Контрольная лампа остается включенной, если калибровка не завершена должным образом. В этом случае проверьте наличие DTC и выполните калибровку снова, если выводятся DTC C1515 и/или C1525. Повторную калибровку следует выполнять в следующем порядке: удаление данных калибровки датчика, калибровка "нуля" датчика крутящего момента, инициализация датчика угла поворота. Если выводятся коды DTC, отличные от C1515 и C1525, перейдите к "ТАБЛИЦЕ ДИАГНОСТИЧЕСКИХ КОДОВ НЕИСПРАВНОСТЕЙ".
Отсоедините SST от DLC3. Выключите зажигание.
А это методика Lexus GS350/GS430 (2007MY).
1. ROTATION ANGLE SENSOR INITIALIZATION AND TORQUE SENSOR ZERO POINT CALIBRATION. NOTICE:
  • Clear the rotation angle sensor calibration value, initialize the rotation angle sensor, and calibrate the torque sensor zero point if any of the following has occurred:
    • The power steering ECU assembly has been replaced.
    • The power steering link assembly has been replaced.
    • Steering effort differs between left and right.

(a) Inspection before calibration
(1) Connect the intelligent tester to the DLC3.
(2) Turn the engine switch on (IG).
(3) Turn the intelligent tester on.
(4) Select "IG SUPPLY" from the data list.
(5) Check the IG power supply voltage on the tester screen: IG SUPPLY 10 to 14 V
NOTICE: If the IG power supply voltage is 9 V or less, calibration cannot be performed. In this case, charge or replace the battery, and then perform calibration.
(b) Rotation angle sensor calibration value clear, rotation angle sensor initialization, and torque sensor zero point calibration
NOTICE:
  • • If DTC C1516 (Torque Sensor Zero Point Adjustment Incomplete) is stored, the torque sensor zero point cannot be calibrated. Clear the DTC before starting calibration.
    • If DTC C1526 (Rotation Angle Sensor Initialization Incomplete) is stored, the rotation angle sensor cannot be initialized. Clear the DTC before starting initialization.

1) Connect the intelligent tester to the DLC3.
(2) Turn the engine switch on (IG).
(3) Turn the intelligent tester on.
(4) Select "TRQ SENSOR ADJ".
(5) Follow the procedures on the tester display to clear the rotation angle sensor calibration value, initialize the rotation angle sensor, and calibrate the torque sensor zero point.
  • NOTICE:
    • When initializing the rotation angle sensor, observe the following to stabilize sensor voltage:
    After turning the engine switch on (IG), wait for at least 2.5 seconds before turning the steering wheel. Do not turn the steering wheel quickly.
    • The steering wheel will vibrate during torque sensor zero point calibration. Do not touch the steering wheel while it is vibrating or for 2 seconds after it stops.
"Ручная" методика Lexus GS350 (2015 MY)
2.MOTOR ROTATION ANGLE SENSOR VALUE INITIALIZATION AND TORQUE SENSOR ZERO POINT CALIBRATION (USING SST CHECK WIRE)
  • NOTICE:
    • If the power steering link assembly or power steering ECU assembly is replaced, or there is a difference in steering effort between turning left and turning right, perform sensor calibration value initialization for the ECU, and then perform motor rotation angle sensor output calibration and torque sensor zero point calibration.
    • If C1516/16 (Torque Sensor Zero Point Adjustment Incomplete) is output, clear DTCs. Otherwise, torque sensor zero point calibration cannot be performed.
    • If C1526/18 (Rotation Angle Sensor Initialization Incomplete) is output, clear DTCs. Otherwise, motor rotation angle sensor output calibration cannot be performed.
(a) Inspection before calibration.
(1) Turn the engine switch off.
(2) Disconnect the power steering ECU connector.
(3) Turn the engine switch on (IG).
(4) Measure the voltage between terminal 14 (IG) of connector A29 (the connector of the wire harness that connects to the power steering ECU) and body ground.
Standard voltage: 11 to 14 V.
  • NOTICE: If the IG power supply voltage is below 9 V, calibration cannot be performed. In this case, charge or replace the battery, and then perform calibration.

(5) Turn the engine switch off.
(6) Reconnect the power steering ECU connector.
(b) Perform sensor calibration value initialization.
(1) Align the front tires and steering wheel so that they are facing straight ahead.
(2) Turn the engine switch off.
3) Using SST, connect terminals 12 (TS) and 4 (CG) of the DLC3, turn the engine switch on (IG) and connect and disconnect terminals 13 (TC) and 4 (CG) of the DLC3 20 times or more within 20 seconds.
dlc3.gif
dlc3.gif (8.81 КБ) 36901 просмотр
4) Check that the power steering warning light turns on.
HINT: DTCs C1515/15 and C1525/17 are stored.
(5) Turn the engine switch off.
  • NOTICE: If the engine switch is left on (IG) after performing sensor calibration value initialization, motor rotation angle sensor output calibration and torque sensor zero point calibration cannot be performed.
c) Perform motor rotation angle sensor output calibration.
  • NOTICE: If DTC C1525/17 (Rotation Angle Sensor Initialization Undone) is not stored, motor rotation angle sensor output calibration cannot be performed. Therefore, be sure to perform sensor calibration value initialization before performing motor rotation angle sensor output calibration.
HINT: Motor rotation angle sensor output calibration calibrates the output values of the motor rotation angle sensor and torque sensor.
(1) Align the front tires and steering wheel so that they are facing straight ahead.
(2) Turn the engine switch off.
(3) Using SST, connect terminals 12 (TS) and 4 (CG) of the DLC3, and then turn the engine switch on (IG).
HINT: If DTC C1525/17 is present when test mode starts, the system automatically switches to motor rotation angle sensor output calibration mode.
(4) Turn the steering wheel 45° or more to the left and right.
NOTICE: After turning the engine switch on (IG), wait 2.5 seconds or more before turning the steering wheel in order to allow the sensor voltage to stabilize. Do not turn the steering wheel quickly.
(d) Perform torque sensor zero point calibration.
  • NOTICE:
    • If DTC C1525/17 (Rotation Angle Sensor Initialization Undone) is stored, torque sensor zero point calibration cannot be performed. Therefore, be sure to perform motor rotation angle sensor output calibration before performing torque sensor zero point calibration.
    • If DTC C1515/15 (Torque Sensor Zero Point Adjustment Undone) is not stored, torque sensor zero point calibration cannot be performed. Therefore, be sure to perform sensor calibration value initialization before performing torque sensor zero point calibration.

(1) Align the front tires and steering wheel so that they are facing straight ahead.
(2) Turn the engine switch off.
(3) Using SST, connect terminals 12 (TS) and 4 (CG) of the DLC3, turn the engine switch on (IG) and connect terminals 13 (TC) and 4 (CG) of the DLC3.
NOTICE: The steering wheel will vibrate during calibration. Do not touch the steering wheel while it is vibrating, and wait at least 2 seconds after the steering wheel stops vibrating before touching it.
  • HINT:
    • If the calibration is completed successfully, the power steering warning light changes from being constantly illuminated to blinking at a frequency of 4 Hz (repeating a pattern of being on for 0.125 seconds, and then off for 0.125 seconds).
    • If the calibration is not completed successfully, the power steering warning light remains illuminated.
    • If the calibration is not completed successfully, check for DTCs.

(4) Disconnect terminals 12 (TS) and 4 (CG), and 13 (TC) and 4 (CG) of the DLC3, and then turn the engine switch off to switch the system from test mode to normal mode.

3. ASSIST MAP WRITING (USING THE TECHSTREAM)
NOTICE: Perform assist map writing when the power steering ECU assembly is replaced.
HINT: If the assist map is not recorded, DTC C1581/26 (Assist Map Un-Writing) is stored and the power steering warning light illuminates.
(a) Turn the engine switch off.
(b) Connect the Techstream to the DLC3.
(c) Turn the engine switch on (IG).
(d) Turn the Techstream on.
(e) Enter the following menus: Chassis / EMPS / Utility / Signal Check.
(f) Wait for 10 seconds or more.
(g) Confirm that the power steering warning light changes from illuminated to blinking at 4 Hz (4 blinks per second).
NOTICE:
• If the power steering warning light does not change from an illuminated state to blinking at 4 Hz (the assist map cannot be recorded), check for DTCs.
• If only DTC C1581/26 (Assist Map Un-Writing) is stored, perform assist map writing again. However, if the assist map cannot be recorded even after performing the procedure 3 times, replace the power steering ECU and perform assist map writing.
• If DTCs other than DTC C1581/26 (Assist Map Un-Writing) are stored, perform troubleshooting according to the diagnostic trouble code chart, and then perform assist map writing.

4. ASSIST MAP WRITING (USING SST CHECK WIRE)
NOTICE: Perform assist map writing when the power steering ECU assembly is replaced.
HINT: If the assist map is not recorded, DTC C1581/26 (Assist Map Un-Writing) is stored and the power steering warning light illuminates.
(a) Turn the engine switch off
(b) Using SST, connect terminals 12 (TS) and 4 (CG) of the DLC3.
(c) Turn the engine switch on (IG).
(d) Wait for 10 seconds or more.
(e) Confirm that the power steering warning light changes from illuminated to blinking at 4 Hz (4 blinks per second).
NOTICE:
• If the power steering warning light does not change from an illuminated state to blinking at 4 Hz (the assist map cannot be recorded), check for DTCs.
• If only DTC C1581/26 (Assist Map Un-Writing) is stored, perform assist map writing again. However, if the assist map cannot be recorded even after performing the procedure 3 times, replace the power steering ECU and perform assist map writing.
• If DTCs other than DTC C1581/26 (Assist Map Un-Writing) are stored, perform troubleshooting according to the diagnostic trouble code chart, and then perform assist map writing.

5. STEERING SENSOR ZERO POINT CALIBRATION
HINT:
• The steering zero point may be cleared if any of the following operations is performed; disconnecting the battery terminal, disconnecting the steering sensor connector or removing the fuses in the steering sensor system.
• Even if the steering zero point is not stored, the power steering warning light does not illuminate.

(a) Start the engine.
(b) Slowly turn the steering wheel 360° clockwise and counterclockwise twice or three times.
(c) Drive the vehicle at a speed of 35 km/h or more for 5 seconds or more.
Аватара пользователя
alflash
Сообщения: 4167
Зарегистрирован: 18 фев 2007, 21:46
Откуда: Одесса
Контактная информация:

Re: Note to "Zero point calibration sensors of Toyota/Lexus

Сообщение alflash »

Особенности этой процедуры для COROLLA, COROLLA VERSO, AVENSIS (AZT25#, ADT25#, CDT250, ZZT25#, AUR10, CUR10, ZNR1#, CDE120, NDE120, ZZE12#)
TSB CP-7020 'ВКЛЮЧЕНИЕ MIL ПРИ КОДЕ DTC C1288 - НЕВОЗМОЖНО ВЫПОЛНИТЬ КАЛИБРОВКУ НУЛЯ ДАТЧИКА ПОЛОЖЕНИЯ РУЛЕВОГО КОЛЕСА' писал(а):КАЛИБРОВКА НУЛЯ ДАТЧИКА УГЛА ПОВОРОТА РУЛЕВОГО КОЛЕСА (с помощью SST).
Примечание:
Выполните калибровку нуля датчика в следующих случаях: замена датчика угла поворота рулевого колеса, ЭБУ системы противоскольжения или ЕСМ; регулировка углов установки передних колес или центральной точки рулевого колеса в связи со снятием, установкой или заменой подвески, полуосей или деталей рулевого управления.
  • 1. Выключите зажигание.
    2. Убедитесь, что рулевое колесо находится в центральном положении, установите рычаг
    переключения передач в положение P (для моделей с автоматической трансмиссией) или
    включите стояночный тормоз (для моделей с механической трансмиссией).
    3. С помощью SST соедините контакты TS и CG разъема DLC3.
    4. Включите зажигание.
    5. Нажмите и удерживайте нажатым выключатель TRC OFF.
    6. Удерживая выключатель TRC OFF нажатым, полностью нажмите и отпустите педаль тормоза не менее 3 раз в течение 2 с (время отсчитывается с момента первого нажатия педали).
    7. Убедитесь, что зуммер системы противоскольжения звучит в течение примерно 3 с.
    8. Удерживайте выключатель TRC OFF нажатым, пока зуммер системы противоскольжения не
    перестанет звучать. Отпустите выключатель, когда зуммер прекратит звучать.
    9. После прекращения звучания зуммера контрольные лампы ABS, тормозной системы, VSC, TRC
    OFF и SLIP должны загореться примерно на 3 с.
    • Примечание. Звучание зуммера системы противоскольжения указывает на успешное завершение калибровки датчика.
      При успешной калибровке нуля датчика все зарегистрированные коды DTC удаляются.
      Если зуммер системы противоскольжения не звучит, выполните калибровку датчика еще раз.
      Не выключайте зажигание и не начинайте движение, пока все контрольные лампы не погаснут.

    10. Выключите зажигание и отсоедините SST от DLC3.
Описание ROTATION ANGLE SENSOR VALUE INITIALIZATION AND TORQUE SENSOR ZERO POINT CALIBRATION для Lexus IS250 2007MY см. в viewtopic.php?f=18&t=1188#p10370
alfa
Сообщения: 526
Зарегистрирован: 09 сен 2015, 22:40

Калибровка датчика рыскания.

Сообщение alfa »

Всем доброго вечера. Имеет меня вот такой авто с кодом С133шесть.
Изображение
Калибровка не проходит или кривые руки. Сначала пытался сканером, делаю сброс, неисправность уходит, калибровка и маемо то що маемо. Чтобы ускорить процесс, взял скрепку, ресечу блок, неисправность уходил, лампочка гаснет, но калибровка не проходит. Что я только не делал, и ручник включал и секунды держания увеличивал.Получаем два варианта, или сразу калибровка датчика не прошла или трогаюсь в боксе 10см и имеем лампочку со скользкой дорогой. Может кто то знает волшебное слово?
Аватара пользователя
alflash
Сообщения: 4167
Зарегистрирован: 18 фев 2007, 21:46
Откуда: Одесса
Контактная информация:

LC 2013MY, DTC C1336

Сообщение alflash »

Видимо не выполняются все необходимые "шаги" калибровки.
Детально опишите последовательность своих действий (при калибровке), покажите контекстные логи, Health Check Results* и предысторию возникновения неисправности. И только тогда можно будет определить "что именно не хватает в супе".
Чем именно (кроме скрепки) калибруете, каким сканером?.

Для справки. Note to "Zero point calibration sensors of Toyota/Lexus" смотрите в viewtopic.php?f=18&t=248

DTC of VSC C1336 (Lamp Code 39) в этом авто для стран Персидского залива означает "Zero point calibration of Deceleration Sensor undone".
Аватара пользователя
alflash
Сообщения: 4167
Зарегистрирован: 18 фев 2007, 21:46
Откуда: Одесса
Контактная информация:

LC 2013MY, DTC C1336

Сообщение alflash »

    • "Для того, чтобы что-то запомнить, надо что-нибудь забыть"
Видимо клиент отвалил, но описание такой процедуры, e.g. for LC TRJ150, может быть полезно другим :)
ВЫПОЛНИТЕ КАЛИБРОВКУ "НУЛЯ" ДАТЧИКА ЗАМЕДЛЕНИЯ И РЫСКАНЬЯ И ДАТЧИКА УГЛА ПОВОРОТА РУЛЕВОГО КОЛЕСА (при использовании диагностического жгута проводов SST aka "скрепка").
  • ПРИМЕЧАНИЕ:
    • Примите меры, чтобы в процессе калибровки "нуля" датчика автомобиль оставался в неподвижном состоянии. Не наклоняйте, не перемещайте и не трясите его (не запускайте двигатель).
    • Описываемые действия необходимо выполнять на ровной поверхности (с наклоном менее 1%).
а) Сбросьте калибровку "нуля" датчика.
  • i. Выключите зажигание.
    ii. Убедитесь, что рулевое колесо установлено в центральное положение.
    iii. Для моделей с механической трансмиссией: Убедитесь в том, что рычаг переключения передач находится в нейтральном положении, и включите стояночный тормоз.
    Для моделей с автоматической трансмиссией: Убедитесь, что рычаг переключения передач находится в положении Р.
    iv. Включите зажигание (IG).
    v. Контрольные лампы ABS и SLIP загораются на 3 с, чтобы проинформировать водителя о том, что первоначальная проверка завершена.
    vi. С помощью SST соедините и разъедините контакты 12 (TS*) и 4 (CG) разъема DLC3 не менее 4 раз в течение 8 с
    vii. Убедитесь, что контрольная лампа SLIP загорелась.
b) Выполните калибровку "нуля" датчика замедления и рысканья.
  • i. Выключите зажигание.
    ii. Убедитесь, что рулевое колесо установлено в центральное положение.
    iii. Для моделей с механической трансмиссией: Убедитесь в том, что рычаг переключения передач находится в нейтральном положении, и включите стояночный тормоз.
    Для моделей с автоматической трансмиссией: Убедитесь, что рычаг переключения передач находится в положении Р.
  • ПРИМЕЧАНИЕ:
    • - Если рычаг переключения передач не находится в положении P (для моделей с автоматической трансмиссией), или не включен стояночный тормоз (для моделей с механической трансмиссией), будут зарегистрированы коды DTC 36 (не выполнена калибровка "нуля" датчика рысканья) и 39 (не выполнена калибровка "нуля" датчика замедления).
      • Если выводится DTC, указывающий на то, что калибровка "нуля" датчика не завершена, повторите процедуру, начиная с удаления данных калибровки "нуля" датчика и системной информации.
    iv. С помощью SST соедините контакты 12 (TS) и 4 (CG) на DLC3.
    v. Включите зажигание (IG).
    vi. Оставьте автомобиль в неподвижном состоянии на ровной поверхности на время не менее 5 с.
    vii. Убедитесь, что контрольная лампа SLIP загорается на несколько секунд, а затем мигает по схеме режима активной диагностики (0,125 с включена и 0,125 с выключена).
    • УКАЗАНИЕ:
      • Если контрольная лампа SLIP не мигает, выполните калибровку "нуля" датчика повторно.
      • После перевода системы в режим активной диагностики калибровку "нуля" датчика можно выполнить только один раз.
      • Калибровку невозможно выполнить повторно, пока из памяти не удалены сохраненные данные.
    viii. Выключите зажигание и отсоедините SST от DLC3.
    • Двигайтесь на автомобиле строго прямо со скоростью 40 км/час (25 миль в час) или выше в течение не менее 10 с.
Off. To B2275 of Corolla (1ZR-FAE)
toB2275.gif
toB2275.gif (9.99 КБ) 23021 просмотр
Закрыто